About this Blog

Follow me in my NEW Adventure of being 30 --2014 will be full of laughter, tears, hard work and lots of photos of all the GREAT things this year will bring.

Thursday, February 27, 2014

#GirlProblems

I made this video last summer for my EI Hair and Makeup Facebook page and never got to upload it due to technical difficulties. So, I figured why not share it now. For the ladies who are stuck inside due to horrible weather conditions* and need something to do or for the women gearing up for summer. You can  practice this for a look and get ready for the warmer weather that is bound to come. 


*For those of you not in Montana now, all public schools and colleges have been cancelled today due to a blizzard. It's a SNOW DAY!
Click here---> For more info!

Monday, February 24, 2014

No Flippin' Way (Part II)

After 18+ hours working on my "Away" animation it's finally finished. Now I have preface this by saying that using a song with lyrics was incredibly difficult, but I just couldn't give it up because it fit too perfectly. With that being said (and maybe its just me) the song does not flow together quite the way I wanted it to but I'm happy with the overall product...Enjoy!


Full Version of the song "Butterfly Net" by Bishop Allen


Thursday, February 13, 2014

No Flippin' Way

Meet Molly...

I have been drawing many versions of her most of my life. Last semester I used her in my story board for one of my biggest projects in my Media Arts history or that's what it felt like anyway (very time consuming). She started out as a stick figure in my high school days. I would doodle and draw many stick figure comics to my friends about the funny things that would happen to us. In my free time I would put Molly into fancy princess gowns with long wavy hair, much like what you see above.

As an observer you would expect to see a completed face, for example, brows, eyes, nose and mouth but Molly has never had a mouth or a neck for that matter. I have never been able to draw her mouth, but I think that's what makes her unique.
From my storyboard/screenplay "Claudette"

In my Fund. of Animation class, we have taken it old school. Over the past 2 weeks I have drawn on 98, 3x5 note cards and made a flip book. Slowly but surely each card makes a short story --that's only the beginning.


This semester I get to bring Molly to life... By the end of all this, these 3x5 cards will be animated with music and sound effects. This is pretty cool right?! I think so, watching all the work I put into these assignments is very rewarding when it's all done...


HAPPY VALENTINE'S DAY!


Thursday, February 6, 2014

No Regrets!


My Second Tattoo "Be Still and Know" Psalm 46:10
done at American Made Tattoo in 2013


Here is the process of getting my third and biggest tattoo...

On the left:
The idea I wanted for my tattoo... The moment I saw this photo I knew I wanted it on my shoulder. I originally wanted a pheniox tattoo, but I'm more than happy with my change of heart.
 
On the right:  The rough drawing my tattooist* came up with (loved it at first sight). He did some research on these flower (Dahlia, Peony and Anemone) for placement and size.

The polished and final product!


My Tips for Getting Your First Tattoo:
1.) Do your research. Know who's doing your tattoo or talk people who already have tattoos and see who they recommend. Don't go to a hole in the wall tattoo shop in Spokane, with tarp hanging around just for a white ink tattoo...that's sketchy (you know who you are). 
2.) Know what you want to get. Or at least have an idea --I had a sketch (photo) of what I wanted ready to go before even stepped foot into a tattoo shop. Don't get your boyfriends name tattooed on your body you will regret it, plus the removal is way worse than the actually getting it done in the first place.
3.) Don't rush. For the teenagers that are reading this, I waited until I was in my 20's before I got my first tattoo. You'll appreciate it more if you wait because it will be for you, and not because it's the "cool" thing to do. 
4.) It's permanent. Be in a good state of mind, avoid times when you are, bored, lonely, depressed or on any mind altering substances. It will be apart of you for generations!
5.) It's gonna hurt. Period. Fortunately, the pain does not last forever and the healing process takes about 2 weeks when you care for your tattoo correctly. Make sure you eat well, are hydrated, and take Advil before and after.
6.) Bring your Tattoo Buddy. Or at least someone who is not afraid of needles or blood. Someone that will distract you from the pain or hold your hand through this process.  Another helpful hint: Music from your iPod would work as a great distraction as well.

Lastly, be creative and take lots of  before and after photos!


Here is what I got done this week --Shading and finished tattoo coming soon!
View from the front...

...and from the back!


"Tattoos have power and magic all on their own. They decorate the body but they enhance the soul."
-Michelle Delio


* I highly recommend Joel at Bound by Glory

Sunday, February 2, 2014

May The Odds Be Ever In Your Favor

Happy Super Bowl Sunday --May the best team win!


As most of you know spring semester has started and already I have plenty to keep me busy. First, I will have 3 blogs all school related which I will share my best work with you over this semester. Good Luck to everyone who has started this new semester!

Please bare with me as I begin this semester...remember the part about how I said this year will bring me tears well this is what I'm talking about. School always consumes a lot of my time but I'm trying to find the balance, so if I miss a few blogs here and there please don't hold it against me. No matter what happens the next few months it will definitely not be boring!


Lastly, this 7-months challenge is "Possessions" in which we get rid of 7 items each day, for 28 days = 196 things we are letting go of*. I'm already living with so little, which will make this month incredibly humbling. We are to record the items we give away and I will do just that and keep y'all posted. 


“Be of good cheer. Do not think of today's failures, but of the success that may come tomorrow. You have set yourselves a difficult task, but you will succeed if you persevere; and you will find a joy in overcoming obstacles. Remember, no effort that we make to attain something beautiful is ever lost."
― Helen Keller


*said by my brother

Friday, January 24, 2014

Mama Mia (Part I)

I recently read an article about the joys and struggles of turning 30*. Number One stated "You will figure out who YOU really are and why you have gone through so much". It goes on to say "You will reflect on your life..." and that's just what I've been doing. I have a close knit group of friends in my life who have been by my side through the good, the bad and the ugly. I can't mention everyone because this blog post would be too long, but I will say that I love and appreciate each and everyone of you more than you will ever know. My life has been rough, unpretty and hard at times and you never judged me, but instead stood beside me no matter what kind of trouble I was getting myself into.

With all that being said I would like to talk about one of these people who has been with me (literally) every step of the way... My Mom. She will be surprised that I'm writing about her because she thought I was doing my "beYOUtiful" blog, but lately it's been on my heart to talk about how amazing my mom is. I know many people can say that their mom is the best or amazing, but my mom and I's relationship is a little different than most.


I'll start from the beginning... I was adopted at 4 months old. My conditions at birth were less than desirable, my birth mother had left me in my crib and unattended for months. As most of you know the first days/months after birth are crucial for bonding with your baby and I never got to bond with anyone. Yes,  very sad I know but one day...actually a miracle happened, being adopted allowed me to grow up with true unconditional love.

I have to be honest and say that I gave my mom hell. Although she would never use that word, I can safely say this because looking back I was not an easy child, teenager or adult in my early/mid 20's. It wasn't until my son was born that life got real and I started realizing how my mom never gave up on me even though she could have walked away at any moment. She told me all the time she would always love me and she did. Now that I'm older and much wiser I can call her my best friend and confidant. It's amazing when I let my guard down and let go of all the secrets (guess what friends...mothers REALLY do know all) that our relationship began to change. 

I've said already that I have several people in my life that have been there for me but I never thought the one I would turn to would be my mom and I'm so happy we are FINALLY at this point in our lives. Mom I Love You, even when I resist  you or roll my eyes...you are truly amazing! 


"Being part of a Family means you are part of something wonderful. It means you will love and be loved for the rest of your life. 
No matter what."


Thursday, January 16, 2014

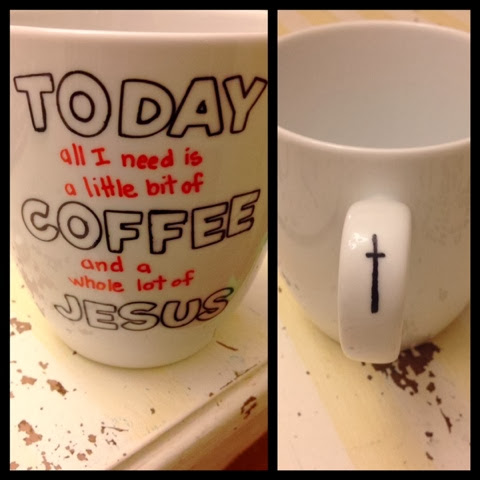
DIY: Painted Mugs

Pinterest inspires me... and sucks me in for hours at a time. It doesn't make for a productive day but it does get the creative juices flowing. Well I have finally put Pinterest to good use by painting on mugs! Lets get started...

You'll Need:
1. Mugs: Mine were from Crate and Barrel $1.95-$3.95 plus shipping
2. Scrapbook Letters at Target $2.99+
3. Scotches Carpenters Tape to make straight lines or to tape down anything you might want to trace and for typography.
4. I used Sharpie Paint (oil based) Markers from the UC Bookstore at about $3 each or you can buy ceramic markers on-line. 

Next
I printed off an outline map of Montana, then taped it and traced it (Of course you can print any state of your  choice).

The quote on this mug: "I am in Love with Montana. For other states I have admiration, respect, recognition, even some affection, but with Montana it is LOVE." -Steinbeck

Baking Instructions:
1. Let paint dry for 24 hours.
2. Once 24 hours has passed, place mugs in cool oven.
3. Turn on oven to 400 and set timer for 40 min.
 4. When the timer goes off let the  mugs cool down in the oven (do not remove).
Lastly, when using bright colors it tends to loose its brightness after baking but at least the color will stay.

 Inside, I put Hershey's peppermint kisses and hot cocoa and VoilĂ  --A gift for any occasion. 
  
I made these mugs for a White Elephant gift exchange.


Helpful Hints:
-Use Rubbing Alcohol for any mistakes before baking.
-The 24/hr drying is important, so leave plenty of time to do this project. 
-Dollar store mugs work just as well as the name brand ones do.
-Have fun!


Here are a few more ideas...


"Creativity is allowing yourself to make mistakes. Art is knowing which ones to keep."
-Scott Adams